Review: DJI Air3s
- Adrian Wirz

- Jan 13
- 4 min read
I've been a drone pilot for about five years now. It's simply fascinating what these little flying objects can do these days. This blog post is about the DJI Air3s, which was introduced in 2024.

After my DJI Air2s served me well for four years, I started looking around the drone market to see what was new. The advancements in drone technology are still significant compared to the previous model. I didn't upgrade from the Air3, but from the Air2s. What particularly piqued my interest were the two cameras: the 24mm wide-angle camera with a 1-inch CMOS sensor and 50MP resolution, and the 70mm telephoto camera with 48MP resolution and a 1/1.3- inch CMOS sensor .
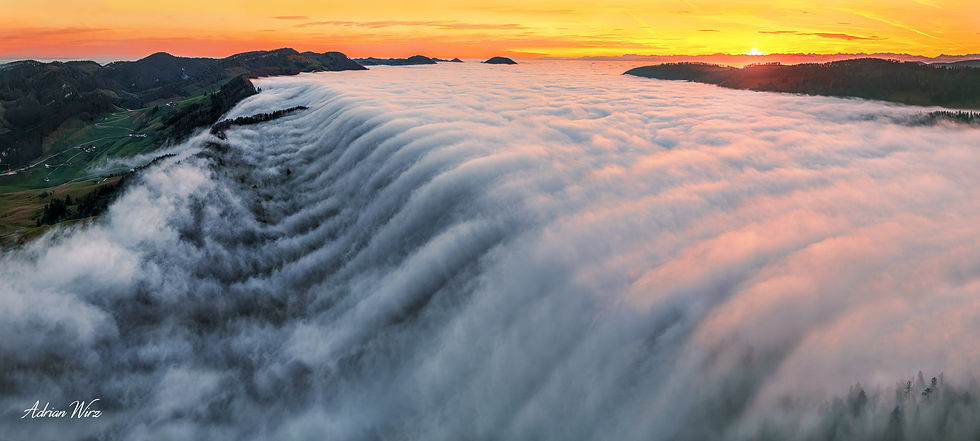
Although the difference in dynamic range compared to the Air2s isn't huge, I'm very happy with the 50MP wide-angle camera. The 70mm telephoto camera is interesting and new to me. Of course, it's still a big difference compared to a single camera sensor, but the parallax effect from the telephoto lens is fascinating. Below are some panoramas.

This panoramic photo above was taken with the 70mm telephoto camera.

I haven't tested the improved LiDAR obstacle detection much yet; I don't really need it much because there are no trees or buildings where I take panoramas, just the occasional light aircraft. The RTH (Return to Home) system, however, is fantastic. If there's nothing between the controller and the drone, this system works flawlessly, with a range of 10 km and more. If the connection is lost, a message appears on the display asking if the drone should return. It then follows the recorded route back, which you can follow on the display. Excellent!

The transmission tower on the Froburg near Wisen

Sunset behind the Vosges Mountains
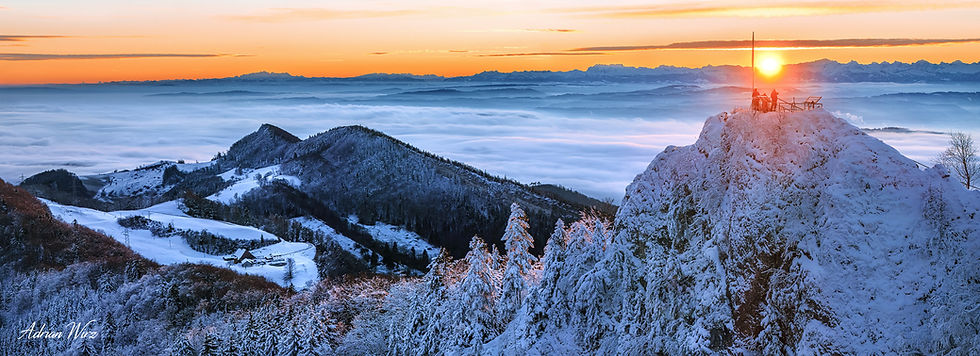
Sunrise at Belchenfluh in the canton of Basel-Landschaft

The first wisps of fog move from the Fricktal region into the Upper Basel region at the end of September.

Sissach at night and during a full moon

Below are some photos showing the parallax effect.

The Alps seem within reach.

The Berghaus Ober-Bölchen is located directly in front of the Bölchenflueh.

The Rhone Glacier right next to the hotel, much as it used to be. Here's a photo from the DJI Air2s for comparison.

The DJI Air 3S is definitely impressive. Weighing in at 724 grams , it's light and easy to handle. Its stability in the air, even in windy conditions, is significantly improved compared to the Air 2s. Its compact design is particularly evident in its dimensions: when folded, it measures only 214.19 x 100.63 x 89.17 mm , while unfolded it measures 266.11 x 325.47 x 106 mm . Despite its lightness, the drone boasts a maximum flight time of up to 45 minutes, making it an ideal companion for longer missions. The 45 minutes are probably only achievable under optimal conditions; my longest flight time was 35 minutes. However, that's quite generous for photographers. Conclusion: Was the upgrade from the Air 2s to the Air 3s worthwhile? Not really, since I earn money with photography and a drone like this costs around 1500 Swiss francs. If it costs that much in a bundle, I wouldn't do it today. Because the same applies here as with the camera: no one has ever asked me about the drone model I use. The new safety features don't make you a better drone pilot, but it's reassuring to know there's now more of a safety margin. Sure, the low-light performance has improved again, but the leap isn't particularly significant. What I really like is the parallax effect with the 70mm lens. However, it only becomes truly noticeable in video recordings. Since I usually take my photos and panoramas early in the morning, I have to pay close attention to the framing. Dark areas can show terrible color noise, while bright areas are often overexposed. So it's always a balancing act! However, Adobe Photoshop has had a brilliant feature for about three years now: image noise can be removed using AI. I find it a very interesting way to remove this annoying image noise, especially in the dark corners.

Here you can see the strong color noise in the lower corners. Of course, I would normally never crank up the shadows to the maximum in a drone photo. But this makes the color noise very noticeable.

Now let's run the AI-powered noise reduction in Photoshop. Depending on the intensity, this can take up to half an hour. I've used the preset intensity of 50% here.

You can see that Adobe Photoshop has done a good job of removing the color noise using AI. With a little fine-tuning or a higher percentage setting, you can get even more out of it. However, caution is always advised, as there's a risk of ending up with just a blurry mess. Currently, the entire noise reduction process is very time-consuming. Subscribe to my newsletter at the bottom of this page and you'll always be among the first to know when a new blog post is published on my website. About 3-4 times a year. And the best part: it's completely free.


